阅读本文前需要您安装了Node环境且已经有能够执行的Npm指令。
以下若描述为主题配置文件则为项目根目录下_config.yml文件。
预览搭建效果页面可以点这里。
环境准备
便于修改,fock hexo相关配置和简历模板仓库和其下主题仓库至自己仓库。
在本地指定文件夹克隆仓库1,其下主题文件夹克隆仓库2:
1
2
| git clone https://github.com/[你的用户名]/resume-docs.git
git clone https://github.com/[你的用户名]/hexo-theme-resume.git resume-docs/themes/resume
|
安装依赖:
本地尝试启动:
1
2
3
4
| # 没有全局hexo指令则安装
npm i -g hexo
# 启动服务
hexo s
|
启动完成查看页面:
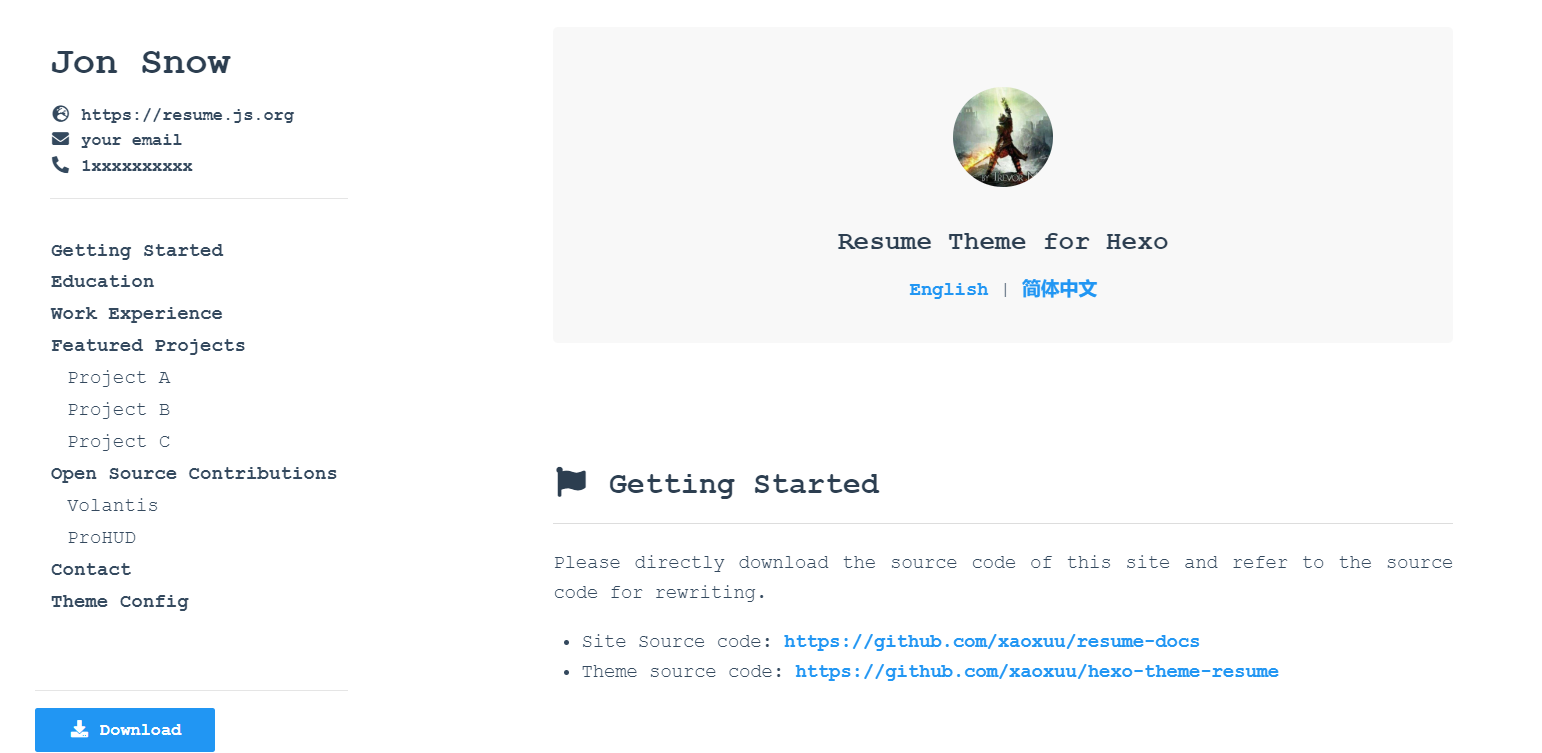
简历主要目录及描述如下:
1
2
3
4
5
6
| ├── src (资源文件内容)
│ ├── zh-cn 中文简历目录
└── index.md 中文简历文件 诸如名称,标题,联系方式,下载文件等简历配置包含在头部
│ └── index.md 英文简历文件 诸如名称,标题,联系方式,下载文件等简历配置包含在头部
├── themes(主题目录)
└── _config.yml(hexo配置文件 主要包含推送配置等)
|
部署
Gitee部署
GithubPage国内访问过于勉强,可以使用Gitee部署。
修改主题配置文件部署目录和推送配置,将推送目录设置在名为仓库名的子文件夹下(因为Gitee部署时的访问网址为https://gonghs.gitee.io/[仓库名])
1
2
3
4
5
6
7
8
9
| url: https://gonghs.gitee.io/[仓库名]
root: [仓库名]
deploy:
type: git
repo: https://github.com/[你的用户名]/resume-docs.git
branch: deploy_gitee
message: update pages
|
重新编译文件并再次执行推送操作:
在Gitee主页中选择导入Github仓库,拉取Github源码:
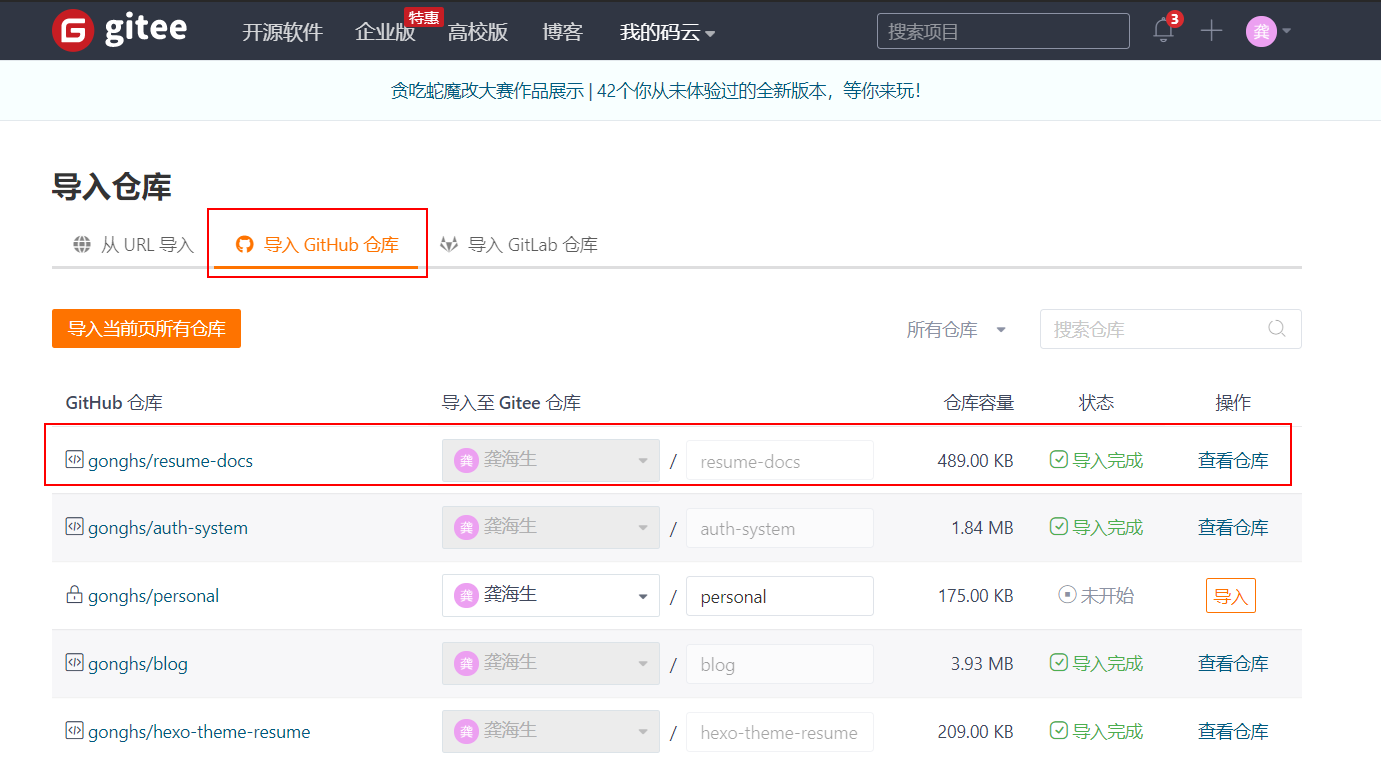
导入完毕选择查看仓库,并在服务选项中找到Gitee Pages:

选择部署分支并更新保存:
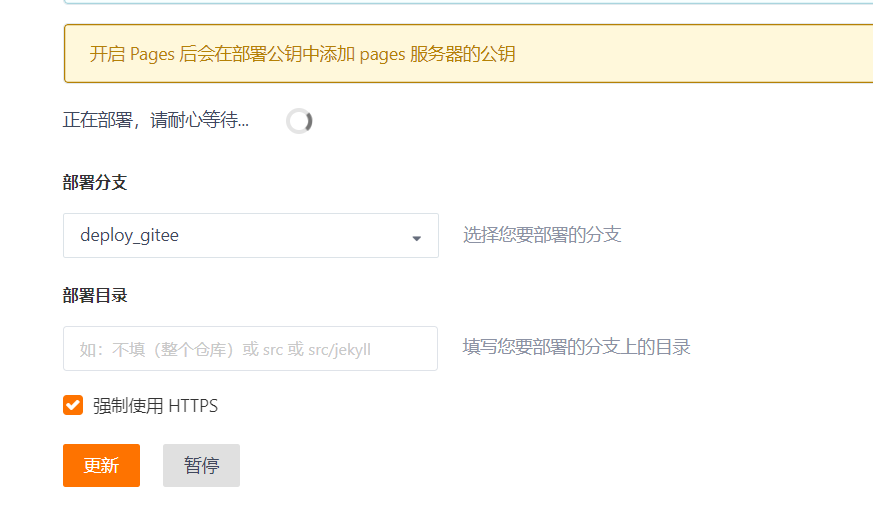
完成后便可以在Gitee上看到自己的简历了。
Centos服务器部署
若要部署在Nginx子路径下需要修改Hexo主题配置:
1
2
| url: http://www.ice-maple.com/about
root: /about/
|
修改主题配置文件推送配置
1
2
3
4
5
| deploy:
type: git
repo: https://github.com/[你的用户名]/resume-docs.git
branch: deploy
message: update pages
|
执行推送:
博客服务器指定目录拉取推送分支:
1
| git clone -b deploy https://github.com/gonghs/resume-docs
|
找到Nginx的配置文件并修改:
1
2
3
4
5
6
7
8
9
10
11
12
13
14
15
16
17
| # 找到配置文件位置
find / -name nginx.conf
# 如果部署在根目录上则加这个
location / {
root /maple/blog/resume-docs/;
index zh-cn/index.html index.htm;
}
# 主要是这一段
location /about/ {
# alias配置则在/maple/blog/resume-docs/下面找 若root配置则会到/maple/blog/resume-docs/about/下面找
alias /maple/blog/resume-docs/;
# 默认访问中文页
index zh-cn/index.html index.htm;
}
|
服务重启:
完成后便可以在服务器上看到自己的简历了。
附1:点击邮箱打开发送邮件页面
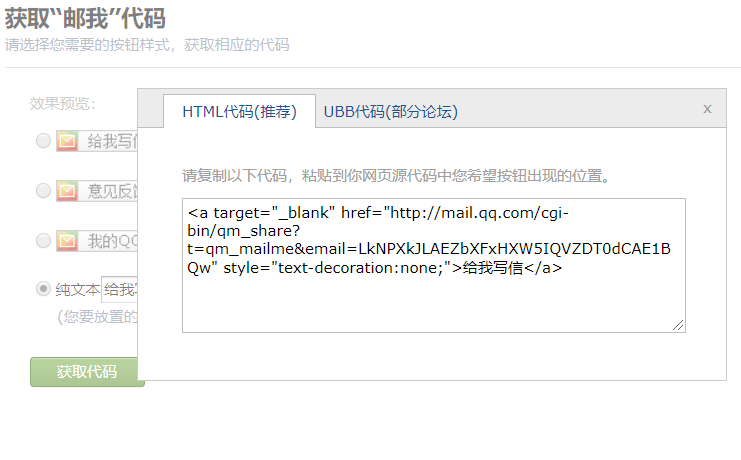
点击邮箱发送邮件,以qq邮箱为例,点击上方设置->账户:
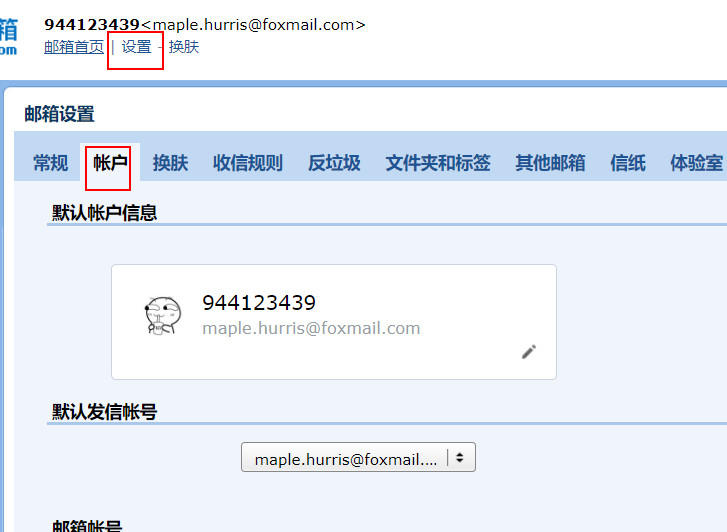
拉至页面最下方使用邮我功能:

选择纯文本并获取代码,拷贝a标签href部分:
修改至简历邮件配置部分:
1
2
3
4
5
6
7
8
9
| # 联系方式
contact:
- icon: fas fa-globe-asia
text: Maples Blogs
url: https://www.ice-maple.com
# 邮箱
- icon: fas fa-envelope
text: maple.haisheng@qq.com
url: http://mail.qq.com/cgi-bin/qm_share?t=qm_mailme&email=LkNPXkJLAEZbXFxHXW5IQVZDT0dCAE1BQw
|
附2:Nginx注册为Centos服务
执行时:
若提示:
Failed to restart nginx.service: Unit not found.
说明ngnix未注册为服务。
执行:
内容:
1
2
3
4
5
6
7
8
9
10
11
12
13
14
15
16
17
18
19
20
21
22
23
24
25
26
27
28
29
30
31
32
33
34
35
36
37
38
39
40
41
42
43
44
45
46
47
48
49
50
51
52
53
54
55
56
57
58
59
60
61
62
63
64
65
66
67
68
69
70
71
72
73
74
75
76
77
78
79
80
81
82
83
84
85
86
87
88
89
90
91
92
93
94
95
96
97
98
99
100
101
102
103
104
105
106
107
108
109
110
111
112
113
114
115
116
117
118
119
120
121
122
123
124
125
126
127
128
129
130
131
132
133
134
135
136
137
138
139
140
141
142
143
144
145
146
147
148
149
150
151
152
153
154
155
156
157
158
159
160
161
162
163
164
165
166
167
168
| #!/bin/sh
# nginx - this script starts and stops the nginx daemin
#
# chkconfig: - 85 15
# description: Nginx is an HTTP(S) server, HTTP(S) reverse \
# proxy and IMAP/POP3 proxy server
# processname: nginx
# config: /usr/local/nginx/conf/nginx.conf
# pidfile: /usr/local/nginx/logs/nginx.pid
# Source function library.
. /etc/rc.d/init.d/functions
# Source networking configuration.
. /etc/sysconfig/network
# Check that networking is up.
[ "$NETWORKING" = "no" ] && exit 0
nginx="/usr/local/nginx/sbin/nginx"
prog=$(basename $nginx)
NGINX_CONF_FILE="/usr/local/nginx/conf/nginx.conf"
lockfile=/var/lock/subsys/nginx
start() {
[ -x $nginx ] || exit 5
[ -f $NGINX_CONF_FILE ] || exit 6
echo -n $"Starting $prog: "
daemon $nginx -c $NGINX_CONF_FILE
retval=$?
echo
[ $retval -eq 0 ] && touch $lockfile
return $retval
}
stop() {
echo -n $"Stopping $prog: "
killproc $prog -QUIT
retval=$?
echo
[ $retval -eq 0 ] && rm -f $lockfile
return $retval
}
restart() {
configtest || return $?
stop
start
}
reload() {
configtest || return $?
echo -n $"Reloading $prog: "
killproc $nginx -HUP
RETVAL=$?
echo
}
force_reload() {
restart
}
configtest() {
$nginx -t -c $NGINX_CONF_FILE
}
rh_status() {
status $prog
}
rh_status_q() {
rh_status >/dev/null 2>&1
}
case "$1" in
start)
rh_status_q && exit 0
$1
;;
stop)
rh_status_q || exit 0
$1
;;
restart|configtest)
$1
;;
reload)
rh_status_q || exit 7
$1
;;
force-reload)
force_reload
;;
status)
rh_status
;;
condrestart|try-restart)
rh_status_q || exit 0
;;
*)
echo $"Usage: $0 {start|stop|status|restart|condrestart|try-restart|reload|force-reload|configtest}"
exit 2
esac
|
然后执行指令:
1
2
| chmod 755 /etc/init.d/nginx
chkconfig --add nginx
|
再次执行重启指令:
附3:网页导出为PDF
在谷歌浏览器中右键选择打印,目标打印机选择PDF
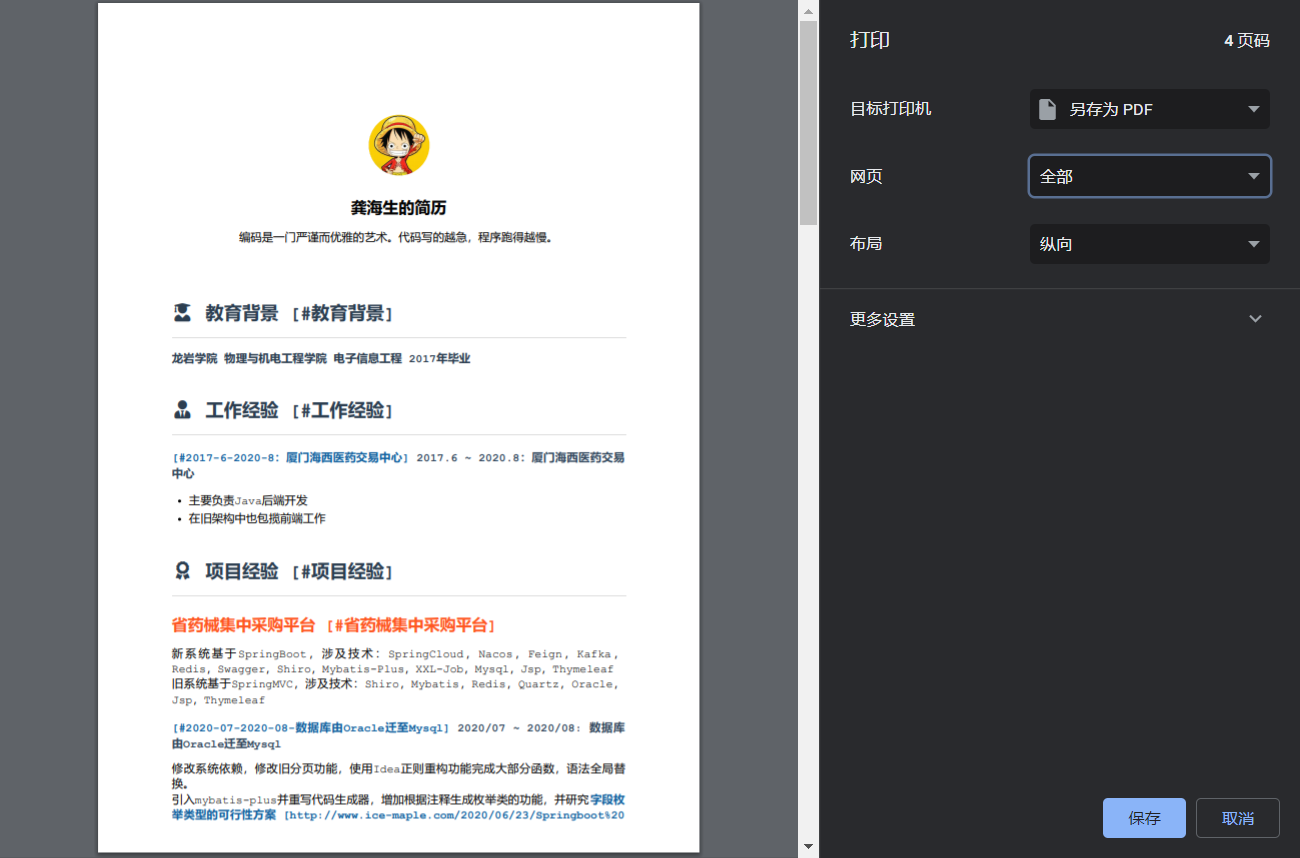
在更多设置里可以选择是否导出背景和页眉页脚。
但无法配置a标签的导出,导致显示会有重复的部分。
因此导出前需要在头部加入样式。
开启开发者工具点选网页找到head部分任意编辑一处style块,并加入以下代码。

1
2
3
4
5
| @media print {
a[href]:after {
content: none !important;
}
}
|
加入后在打印预览处就不会再看到多出来的a标签部分。
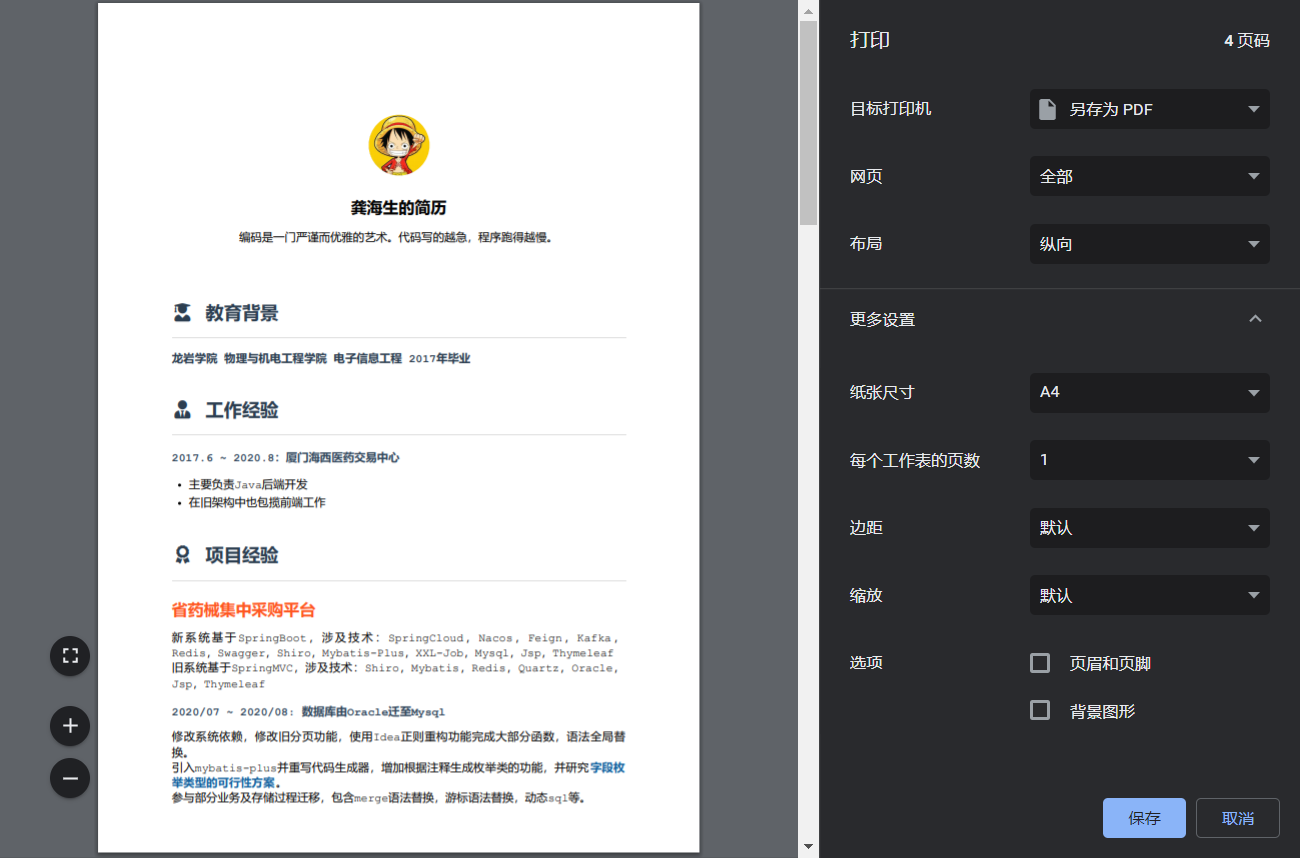
导出后可以上传至服务器或Gitee上,并修改至简历下载配置中。
1
2
3
4
5
|
download:
title: PDF下载
icon: fas fa-download fa-fw
url: http://www.ice-maple.com/uploads/Maple's Resume.pdf
|


